AWS Elastic Container Service Anywhere | Raspberry Pi 5

I have been using Docker at home for what must be close to a decade now. Over this time, the hardware has changed many times as the need for more speed has grown, components have failed or I just wanted something new.
This got me thinking about how corporations have already invested in their own hardware and are either running it as ‘bare-metal’ servers or most likely running a hypervisor such as VMware, Hyper-V or XenServer. Those corporations likely also have a modernisation strategy (hopefully) to containerise their applications, if not skipping past this stage and going straight to serverless.
Rather than going all in on “Cloud” from day one why not (where it makes sense) to use the hardware that you have which is already running in the cupboard, server room or cololation facility??
Elastic Container Service (ECS) Anywhere is an extention to AWS Elastic Container Service (ECS) that allows you to run and manage Amazon ECS tasks on your own compute resources (physical or virtual) no matter its location, including another public cloud. This enables you to use the same deployment, release and management strategy across containers/services in AWS, but on your own infrastructure. The added benefit here, is when the hardware does go end-of-life or the support contract expires, then most of the hard work is already done. You can simply move the target of the container from your hardware to AWS’, (I say “simply” but we all know how that goes).
Scenario: Full On-Premise
You have an internal application running in a virtual machine (VM) that is latency sensitive and therefore benefits from running as close to the client as possible. Each branch office already has a server…. so spin up another VM, set up ECS anywhere and run the application in a container.
Patching the application may become easier too. Rather than patching the application at each site, a new container image with the patched version can be created and tested (out of band), and simply be replaced at each branch office in a short maintenance window all from a central location (ECS console).
**NOTE: this assumes the application can be run in a container **
Scenario: Scaling
Another scenario is where you are publishing applications/services externally and periodically you experience spikes in demand due to say an event or sale. Rather than purchasing additional compute resources for these times, why not use AWS as “burst capacity” by extending your compute resources to AWS during those spikes in demand.
Demo Environment:
Enough talking, time to set up a demo environment.
For this post, I’m going full circle back to using my first host….a Raspberry Pi, sort of. Ok… so this version of the Raspberry Pi (5) is no slouch, especially when paired with an NVMe drive running at PCIe Gen3 speeds, but its cool to see how far this credit card size computer has come over the years. Jeff Geerling has done a great YouTube video on using NVMe drive with the Raspberry Pi 5 if you are interested to know more (including performance numbers)
I will also show you how to use VirtualBox and Vagrant to achieve the same outcome for x86 hardware.
Setup:
- Raspberry Pi 5 8GB
- Pimoroni NVMe Base
- 500GB Crucial 500 P3 Plus
- Ubuntu 24.04
AWS Resources
It should come as no surprise by now that I will be using Terraform to setup this environment.
To keep everything organised lets define a variable for the project we are working on
1
2
3
4
5
6
7
8
variable "project_name" {
  description = "The project name"
  type        = string
  default     = "ecsanywhere"
}

data "aws_region" "current" {}
data "aws_caller_identity" "current" {}
ECS Cluster:
We need to have an ECS cluster in AWS to register our external instance (host) with. We also want logs for when something doesn’t work or it breaks aid with troubleshooting.
Encryption? not really a question these days
1
2
3
4
5
6
7
8
9
10
11
12
13
14
15
16
17
18
19
20
21
22
23
24
resource "aws_kms_key" "this" {
  description             = "${var.project_name} KMS Key"
  deletion_window_in_days = 7
}

resource "aws_cloudwatch_log_group" "this" {
  name = "/ecs/${var.project_name}"
}

resource "aws_ecs_cluster" "this" {
  name = "${var.project_name}-cluster"

  configuration {
    execute_command_configuration {
      kms_key_id = aws_kms_key.this.arn
      logging    = "OVERRIDE"

      log_configuration {
        cloud_watch_encryption_enabled = true
        cloud_watch_log_group_name     = aws_cloudwatch_log_group.this.name
      }
    }
  }
}
Systems Manager (SSM) role:
The AWS Systems Manager Agent (SSM Agent) will be installed and used to establish secure communications between our external instance (Raspberry Pi) and AWS. For the external instance to communicate with AWS services, it needs to assume an AWS Identity and Access Management (IAM) role. This role provides the necessary permissions and authentication to interact with AWS services.
Thankfully AWS has already done the hard work here and we can just attach the AmazonSSMManagedInstanceCore and AmazonEC2ContainerServiceforEC2Role policies to our role. However, these policies normally have more permissions than are required so it is worth while understanding what you need and then craft a policy to match.
For your reference: AWS ECS Anywhere IAM Role
1
2
3
4
5
6
7
8
9
10
11
12
13
14
15
16
17
18
19
20
21
22
23
24
25
26
27
data "aws_iam_policy_document" "assume_role" {
  statement {
    effect = "Allow"

    principals {
      type        = "Service"
      identifiers = ["ssm.amazonaws.com"]
    }

    actions = ["sts:AssumeRole"]
  }
}

resource "aws_iam_role" "this" {
  name               = "${var.project_name}-role"
  assume_role_policy = data.aws_iam_policy_document.assume_role.json
}

resource "aws_iam_role_policy_attachment" "ssm_attach" {
  role       = aws_iam_role.this.name
  policy_arn = "arn:aws:iam::aws:policy/AmazonSSMManagedInstanceCore"
}

resource "aws_iam_role_policy_attachment" "ec2_container_attach" {
  role       = aws_iam_role.this.name
  policy_arn = "arn:aws:iam::aws:policy/service-role/AmazonEC2ContainerServiceforEC2Role"
}
SSM activation:
To add the Raspberry Pi to SSM we need an activation id and activation code. Since I will only be adding a single external instance to my cluster I have set the registration limit to 1.
1
2
3
4
5
6
7
resource "aws_ssm_activation" "this" {
  name               = "${var.project_name}_ssm_activation"
  description        = "${var.project_name} SSM Activation"
  iam_role           = aws_iam_role.this.id
  registration_limit = "1"
  depends_on         = [aws_iam_role.this]
}
Register host in SSM and as an external instance in ECS:
Time to SSH into the Raspberry Pi and run the installer. Here is where using outputs in Terraform comes in handy, as we can use the resources already defined in our Infrastructure as Code (IaC) to output the bash command we need.
1
2
3
output "ecs_registration_command" {
  value = "curl --proto 'https' -o '/tmp/ecs-anywhere-install.sh' 'https://amazon-ecs-agent.s3.amazonaws.com/ecs-anywhere-install-latest.sh' && bash /tmp/ecs-anywhere-install.sh --region ${data.aws_region.current.name} --cluster ${aws_ecs_cluster.this.name} --activation-id ${aws_ssm_activation.this.id} --activation-code ${aws_ssm_activation.this.activation_code}"
}
Result:
Once the registration command successfully completes, going into the AWS console, we now have a managed instance in SSM and an external instance in ECS 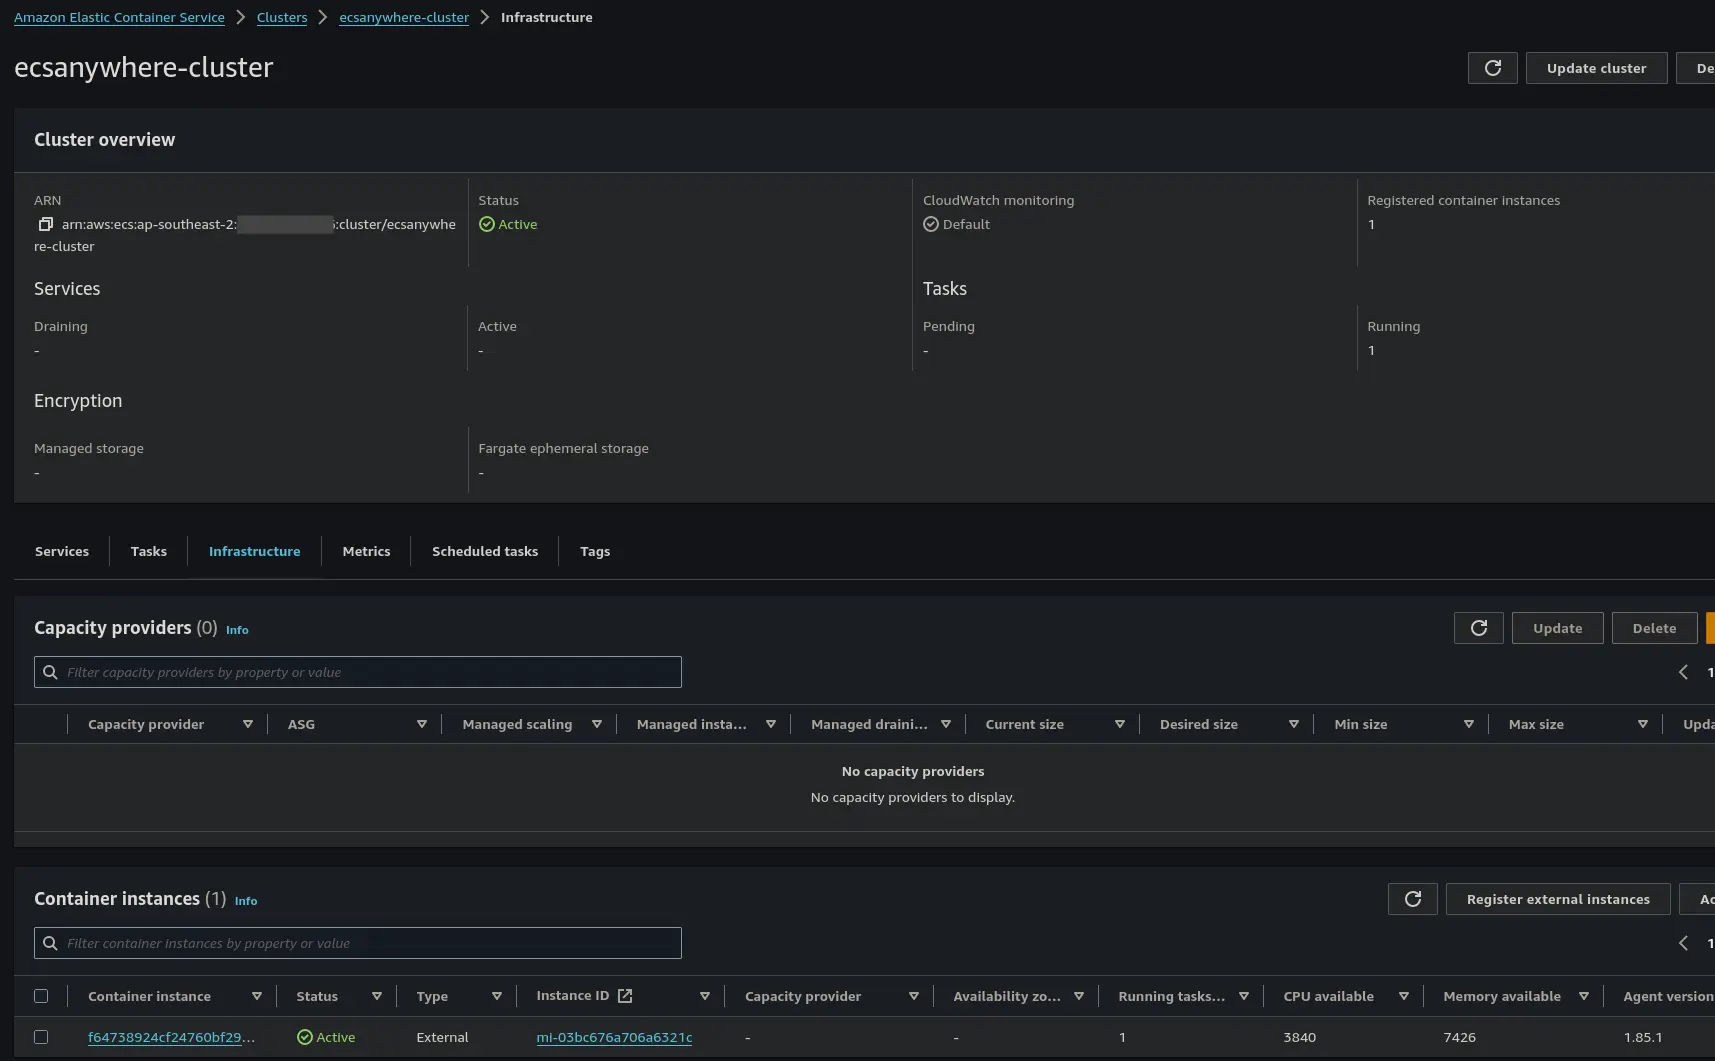
ECS Service/Container:
What is the point of having a container host without any containers…. and to be as generic as possible lets spin up a Nginx container.
Task Definition and Service:
Finally, lets define our task. Since we are running an external instance (host) there are a few considerations:
- Linux tasks must use the
bridge, host or nonenetwork modes, while Windows Tasks must use thedefaultnetwork mode.awsvpcnetwork mode isn’t supported here. Externalis the only available launch type.
The below will:
- Run the latest version of the nginx container
- Assign .25 vCPU and .5 GB of Memory
- CPU architecture is ARM64 (RaspberryPi)
- Assign TCP 8080 on the host which maps (NATs) through to TCP 80 within the container
- Configures the logs to be sent to AWS cloudwatch
1
2
3
4
5
6
7
8
9
10
11
12
13
14
15
16
17
18
19
20
21
22
23
24
25
26
27
28
29
30
31
32
33
34
35
36
37
38
39
40
41
42
43
44
45
resource "aws_ecs_task_definition" "nginx" {
  family                   = "service"
  network_mode             = "bridge"
  requires_compatibilities = ["EC2"]
  cpu                      = "256"
  memory                   = "512"
  runtime_platform {
    cpu_architecture = "ARM64"
  }
  container_definitions = jsonencode([
    {
      name      = "nginx",
      image     = "nginx:latest",
      essential = true,
      portMappings = [
        {
          "containerPort" : 80,
          "hostPort" : 8080
        }
      ],
      logConfiguration = {
        logDriver = "awslogs"
        options = {
          "awslogs-group"         = aws_cloudwatch_log_group.this.name
          "awslogs-region"        = data.aws_region.current.name
          "awslogs-stream-prefix" = "nginx"
        }
      }
    }
    ]
  )
}

resource "aws_ecs_service" "nginx" {
  depends_on      = [aws_iam_role.ecs_task_execution_role]
  name            = "nginx-service"
  cluster         = aws_ecs_cluster.this.id
  task_definition = aws_ecs_task_definition.nginx.arn
  desired_count   = 1
  launch_type     = "EXTERNAL"

  deployment_controller {
    type = "ECS"
  }
}
Result
As you can see, from running docker ps, we now have a nginx container and the ECS agent running on our Raspberry Pi Host. 
Browsing to the RaspberryPi on port 8080 we are presented with the familar default nginx page 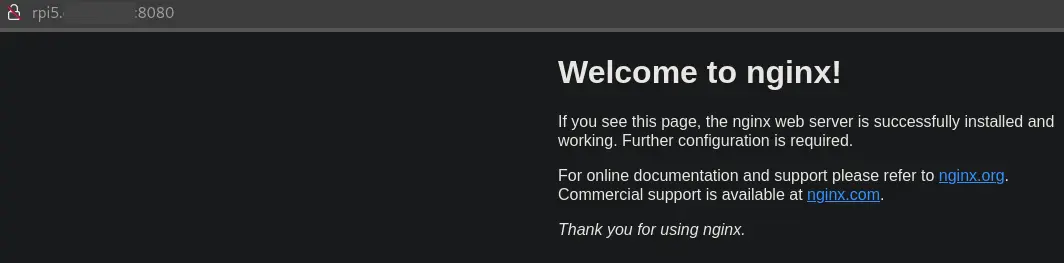
Conclusion
Whilst this is a very simple example of getting a container to run on an external instance and being able to be managed from AWS, it shows how we can use existing hardware investments and expose our service locally to our LAN.
With no connectivity to our AWS VPC or inbound external connectivity the use case for this setup is limited but we don’t need to stop there…..
Extra Credit
Not everyone has a RaspberryPi so sticking with the theme of using the hardware we already have…
Install VirtualBox and Vagrant
This will depends on your operating :
Bring your Virtual Machine to Life
1
vagrant init ubuntu/mantic64 ## Ubuntu 23.10
Before starting the VM, lets do some customisation to make it ready for our use case:
- Set the name of the VM in VirtualBox
- Set the hostname of the VM
- Set CPU and Memory
- Forward Port 8080 to 80
1
2
3
4
5
6
7
8
9
10
11
12
13
  config.vm.box = "ubuntu/mantic64"
  config.vm.define "ecs-vm"
  config.vm.hostname = "ecs-vm"
  config.vm.provider "virtualbox" do |v|
    v.name = "ecs-vm"
    v.memory = 8192
    v.cpus = 2
  end
  config.vm.network "forwarded_port", guest: 80, host: 8080, host_ip: "127.0.0.1"
  config.vm.provision "shell", inline: <<-SHELL
    apt-get update
    <output from ecs_registration_command>
  SHELL
***Note: substitute
1
2
3
4
5
6
7
8
9
10
11
12
13
14
15
16
17
18
19
20
21
22
23
vagrant up

Bringing machine 'ecs-vm' up with 'virtualbox' provider...
==> ecs-vm: Importing base box 'ubuntu/mantic64'...
==> ecs-vm: Matching MAC address for NAT networking...
==> ecs-vm: Checking if box 'ubuntu/mantic64' version '20240701.0.0' is up to date...
==> ecs-vm: Setting the name of the VM: ecs-vm
==> ecs-vm: Clearing any previously set network interfaces...
==> ecs-vm: Preparing network interfaces based on configuration...
    ecs-vm: Adapter 1: nat
==> ecs-vm: Forwarding ports...
    ecs-vm: 80 (guest) => 8080 (host) (adapter 1)
    ecs-vm: 22 (guest) => 2222 (host) (adapter 1)
==> ecs-vm: Running 'pre-boot' VM customizations...
==> ecs-vm: Booting VM...
==> ecs-vm: Waiting for machine to boot. This may take a few minutes...
    ecs-vm: SSH address: 127.0.0.1:2222
    ecs-vm: SSH username: vagrant
    ecs-vm: SSH auth method: private key
==> ecs-vm: Machine booted and ready!
==> ecs-vm: Setting hostname...
==> ecs-vm: Running provisioner: shell...
    ecs-vm: Running: inline script
Since we customisated our vagrant config to include the ecs registration command, we shouldn’t need to SSH into our VM but who doesn’t like to just check it actually worked.
1
2
3
4
5
6
7
8
9
10
11
12
13
14
15
16
17
18
19
20
21
22
23
vagrant ssh ecs-vm

Welcome to Ubuntu 23.10 (GNU/Linux 6.5.0-42-generic x86_64)

 * Documentation:  https://help.ubuntu.com
 * Management:     https://landscape.canonical.com
 * Support:        https://ubuntu.com/pro

 System information as of Fri Jul  5 08:10:18 UTC 2024

  System load:  0.19              Processes:               111
  Usage of /:   3.7% of 38.70GB   Users logged in:         0
  Memory usage: 2%                IPv4 address for enp0s3: 10.0.2.15
  Swap usage:   0%


0 updates can be applied immediately.

New release '24.04 LTS' available.
Run 'do-release-upgrade' to upgrade to it.


vagrant@ecs-vm:~$
Task definition:
Depending on the hardware you are using to run Virtual Box, you may need to change the cpu architecture in the task definition.
1
2
3
4
5
6
7
resource "aws_ecs_task_definition" "nginx" {
...
  runtime_platform {
    cpu_architecture = "X86_64"
  }
...
}
Result
Browsing to the ECSVM on port 8080 we are again presented with the familar default nginx page 
Like Terraform, when you are done…. DESTROY!!!
1
2
3
4
5
vagrant destroy

ecs-vm: Are you sure you want to destroy the 'ecs-vm' VM? [y/N] y
==> ecs-vm: Forcing shutdown of VM...
==> ecs-vm: Destroying VM and associated drives...