AWS API Gateway - REST

Let’s talk AWS API Gateway….
I don’t know about you but it seems every time I have the need to use an API Gateway, I have somehow managed to completely forget everything I once knew about it. I find myself having to flip back and forth between my Terraform code and the AWS console, trying to make heads or tails of it all over again.
With that in mind, the goal of this blog post is to create a simple guide for myself (and anyone else who might find it useful) on how to set up an API Gateway with a “mocked” healthcheck.
What is AWS API Gateway?
AWS API Gateway is a service that essentially acts as a front door to your applications, whilst making it easy for developers to create, publish, maintain, monitor, and secure APIs at any scale. AWS API Gateway is used to decouple your application from its backend components/service. One of the added benefit is it also can handle authentication/authorisation.
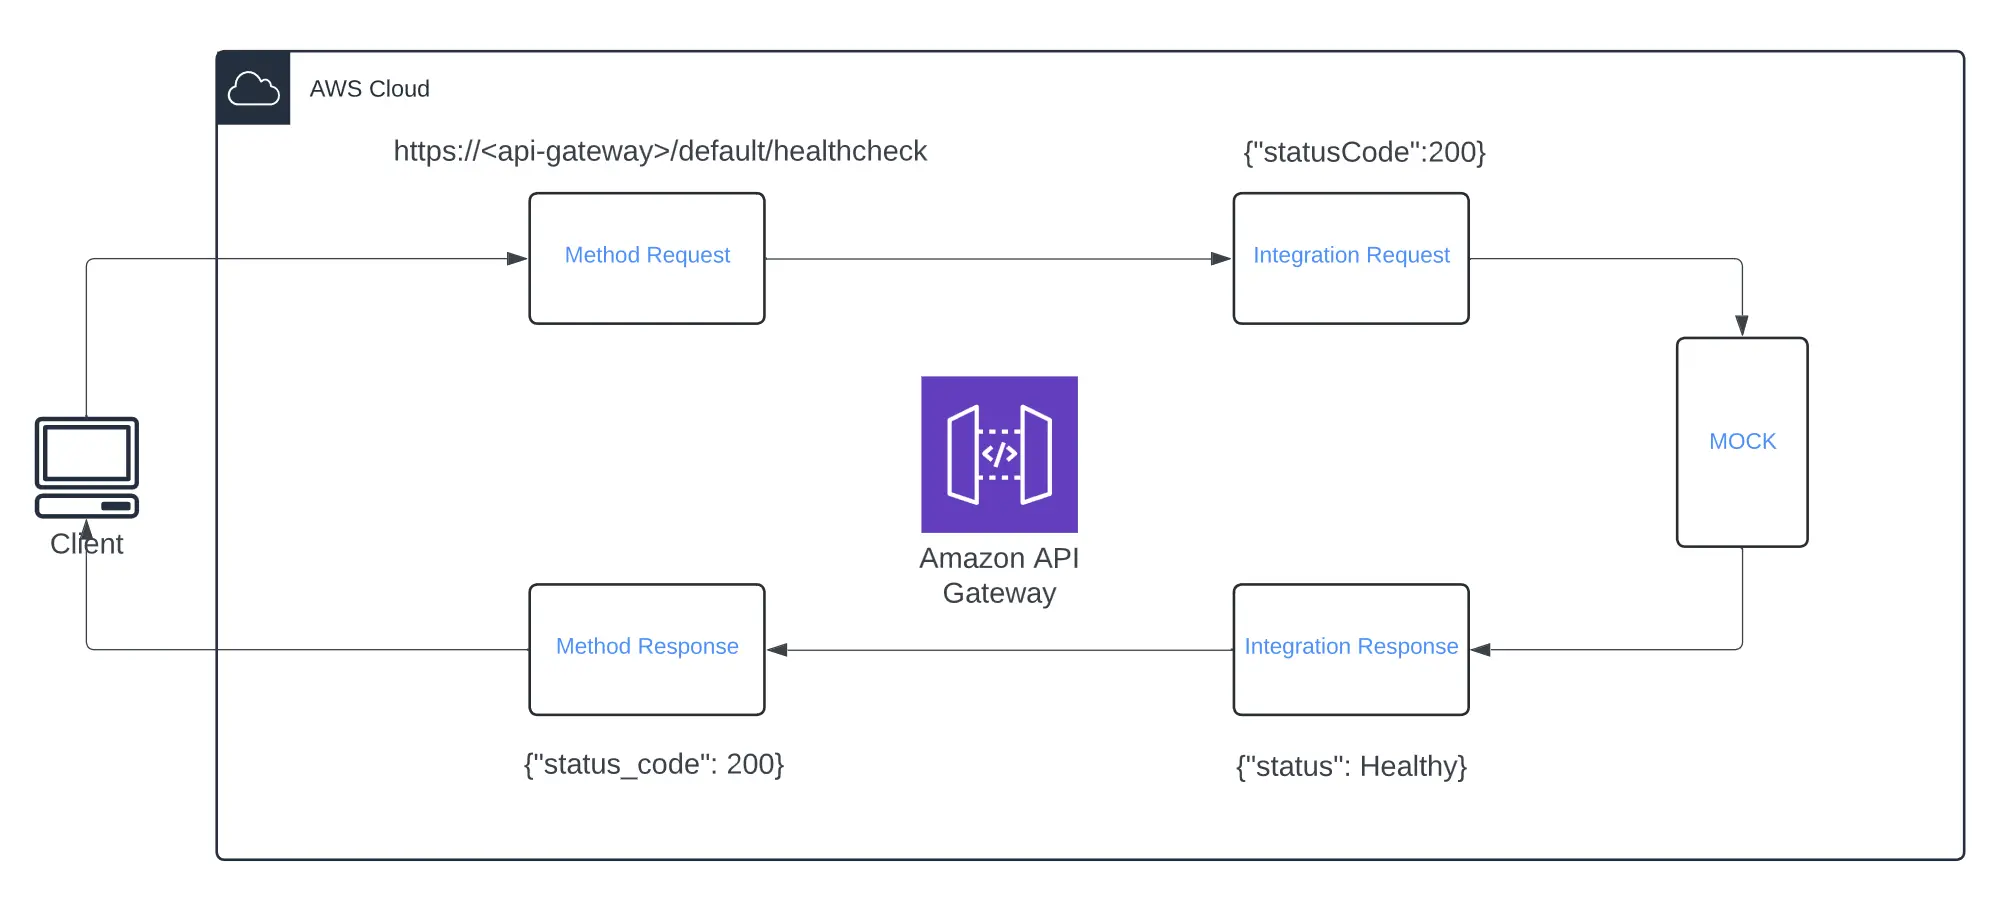
How it works:
- The client makes a request to the API Gateway.
- The API Gateway sends the request to the backend integration (like a Lambda function, an HTTP endpoint, or a MOCK integration).
- The backend integration processes the request and sends a response back to the API Gateway.
- The integration response processes the backend response. It can map the backend response data to the method response format, transform the data, or handle errors.
- The processed response is sent back to the client.
Configuring a REST API in Terraform:
Now let’s break down the steps involved in creating a simple REST API using a MOCKED integration. We will then CURL the endpoint (healthcheck) to verify we can authenticate as well as invoke the API we built.
Step 1: Variables and Provider Setup
First, we’ll define the variables and the AWS provider.
1
2
3
4
5
6
7
8
9
10
11
12
13
14
15
16
17
18
19
20
21
22
23
24
25
26
terraform {
  required_version = "~> 1.7"
  required_providers {
    aws = {
      source  = "hashicorp/aws"
      version = "~> 5.0"
    }
  }
}

provider "aws" {
  region = "ap-southeast-2"
}

variable "api_name" {
  description = "The name of the API Gateway"
  type        = string
  default     = "my-api"
}

variable "stage_name" {
  description = "The name of the API Gateway stage"
  type        = string
  default     = "default"
}
Step 2: Create the API
Next, we’ll create the type of REST API we want.
There are three Endpoint types to select from when using the REST API:
- Regional APIs are deployed in the current AWS Region
- Edge-optimized APIs route requests to the nearest CloudFront Point of Presence.
- Private APIs are only accessible from VPCs.
1
2
3
4
5
6
7
8
9
10
11
12
// Create an API Gateway REST API resource in the specified region
resource "aws_api_gateway_rest_api" "api" {
  name = var.api_name // "my-api"

  endpoint_configuration {
    types = ["REGIONAL"]
  }

  lifecycle {
    create_before_destroy = true
  }
}
Step 3: Create a Resource
Next, we need to define a “resource”, which specifies a URL path to interact with your API. For our purpose, since we are setting up a healthcheck our resource will be /healthcheck.
However, let’s say you were building an API for an online store, you might want the resources to be called /products, /orders, and /customers etc. Each resource represents a distinct part of your API and typically corresponds to a logical entity in your application.
1
2
3
4
5
6
// Create a resource in the API Gateway REST API
resource "aws_api_gateway_resource" "healthcheck" {
  rest_api_id = aws_api_gateway_rest_api.api.id
  parent_id   = aws_api_gateway_rest_api.api.root_resource_id
  path_part   = "healthcheck"
}
Step 4: Create a Method
Next up is a Method, each resource can have multiple methods associated with it, such as GET, POST, PUT, DELETE. These methods define how the resource can be interacted with.
For example, a GET method on the /healthcheck resource might return a "status": "Healthy" message, while a POST on the /orders resource could be for submitting a new order for our hypothetical online store.
1
2
3
4
5
6
7
8
// Create a GET method for the resource using AWS_IAM authorisation
resource "aws_api_gateway_method" "get_healthcheck" {
  rest_api_id   = aws_api_gateway_resource.healthcheck.rest_api_id
  resource_id   = aws_api_gateway_resource.healthcheck.id
  http_method   = "GET"
  authorization = "NONE"
  api_key_required = true
}
As I mentioned earlier, one of the keys benefits of using AWS API Gateway is that has multiple built-in authentication/authorisation methods it provides, which are:
- NONE - open access
- AWS_IAM - Uses AWS IAM permissions
- CUSTOM - Uses a custom authorizer (such as a Lambda)
- COGNITO_USER_POOLS - Uses a Cognito user pool
This time around, I wanted to try out using an API key, so authorisation is configured as NONE, but an API Key is still required.
Step 5: Create an Integration
Time for the integration… there is a few integration types we can select from, which link to backend services such as a HTTP endpoint, a Lambda function or in our case, a MOCK endpoint. When a request is made to a resource, The integration type determines how the incoming request is processed and routed by API Gateway.
For our healthcheck example, we will use the MOCK integration type to simulate responses without needing a backend service.
1
2
3
4
5
6
7
8
9
10
11
12
13
14
15
16
// Create an integration for the GET method using a MOCK type to simulate a successful health check
resource "aws_api_gateway_integration" "get_healthcheck" {
  rest_api_id = aws_api_gateway_method.get_healthcheck.rest_api_id
  resource_id = aws_api_gateway_method.get_healthcheck.resource_id
  http_method = aws_api_gateway_method.get_healthcheck.http_method

  type = "MOCK"

  request_templates = {
    "application/json" = jsonencode(
      {
        statusCode = 200
      }
    )
  }
}
Here we are telling the API Gateway to respond with a statusCode of 200 (in JSON) whenever a request with a content-type of application/json to this MOCK integration is invoked for the /healthcheck resource.
Step 6: Create a Method Response
The method response is a predefined configuration that specifies how the API Gateway should format and return responses to the client for a given method. Essentially, it simulates a backend service by providing static responses for requests made to the API.
1
2
3
4
5
6
7
8
// Create a method response for the GET method with a ```200``` status code
resource "aws_api_gateway_method_response" "get_healthcheck" {
  rest_api_id = aws_api_gateway_method.get_healthcheck.rest_api_id
  resource_id = aws_api_gateway_method.get_healthcheck.resource_id
  http_method = aws_api_gateway_method.get_healthcheck.http_method

  status_code = "200"
}
The method response for a health check endpoint typically includes a 200 (OK) status code. This indicates that the MOCK integration can successfully generate a response for this GET /healthcheck method and everything is all good.
Step 7: Create a Integration Response
The integration response configuration tells the API Gateway how it needs to transform the mock responses it generates into the final responses that are returned while adhering to the expected format/structure for the client as defined in the method responses.
1
2
3
4
5
6
7
8
9
10
11
12
13
14
15
// Create an integration response for the GET method with a 200 status code
resource "aws_api_gateway_integration_response" "get_healthcheck" {
  rest_api_id = aws_api_gateway_method.get_healthcheck.rest_api_id
  resource_id = aws_api_gateway_method.get_healthcheck.resource_id
  http_method = aws_api_gateway_method.get_healthcheck.http_method
  status_code = aws_api_gateway_method_response.get_healthcheck.status_code

  response_templates = {
    "application/json" = jsonencode(
      {
        status = "Healthy"
      }
    )
  }
}
Our integration response, tells the API gateway that for any responses with the content type application/json, the response body needs to be "status": "Healthy" in the JSON.
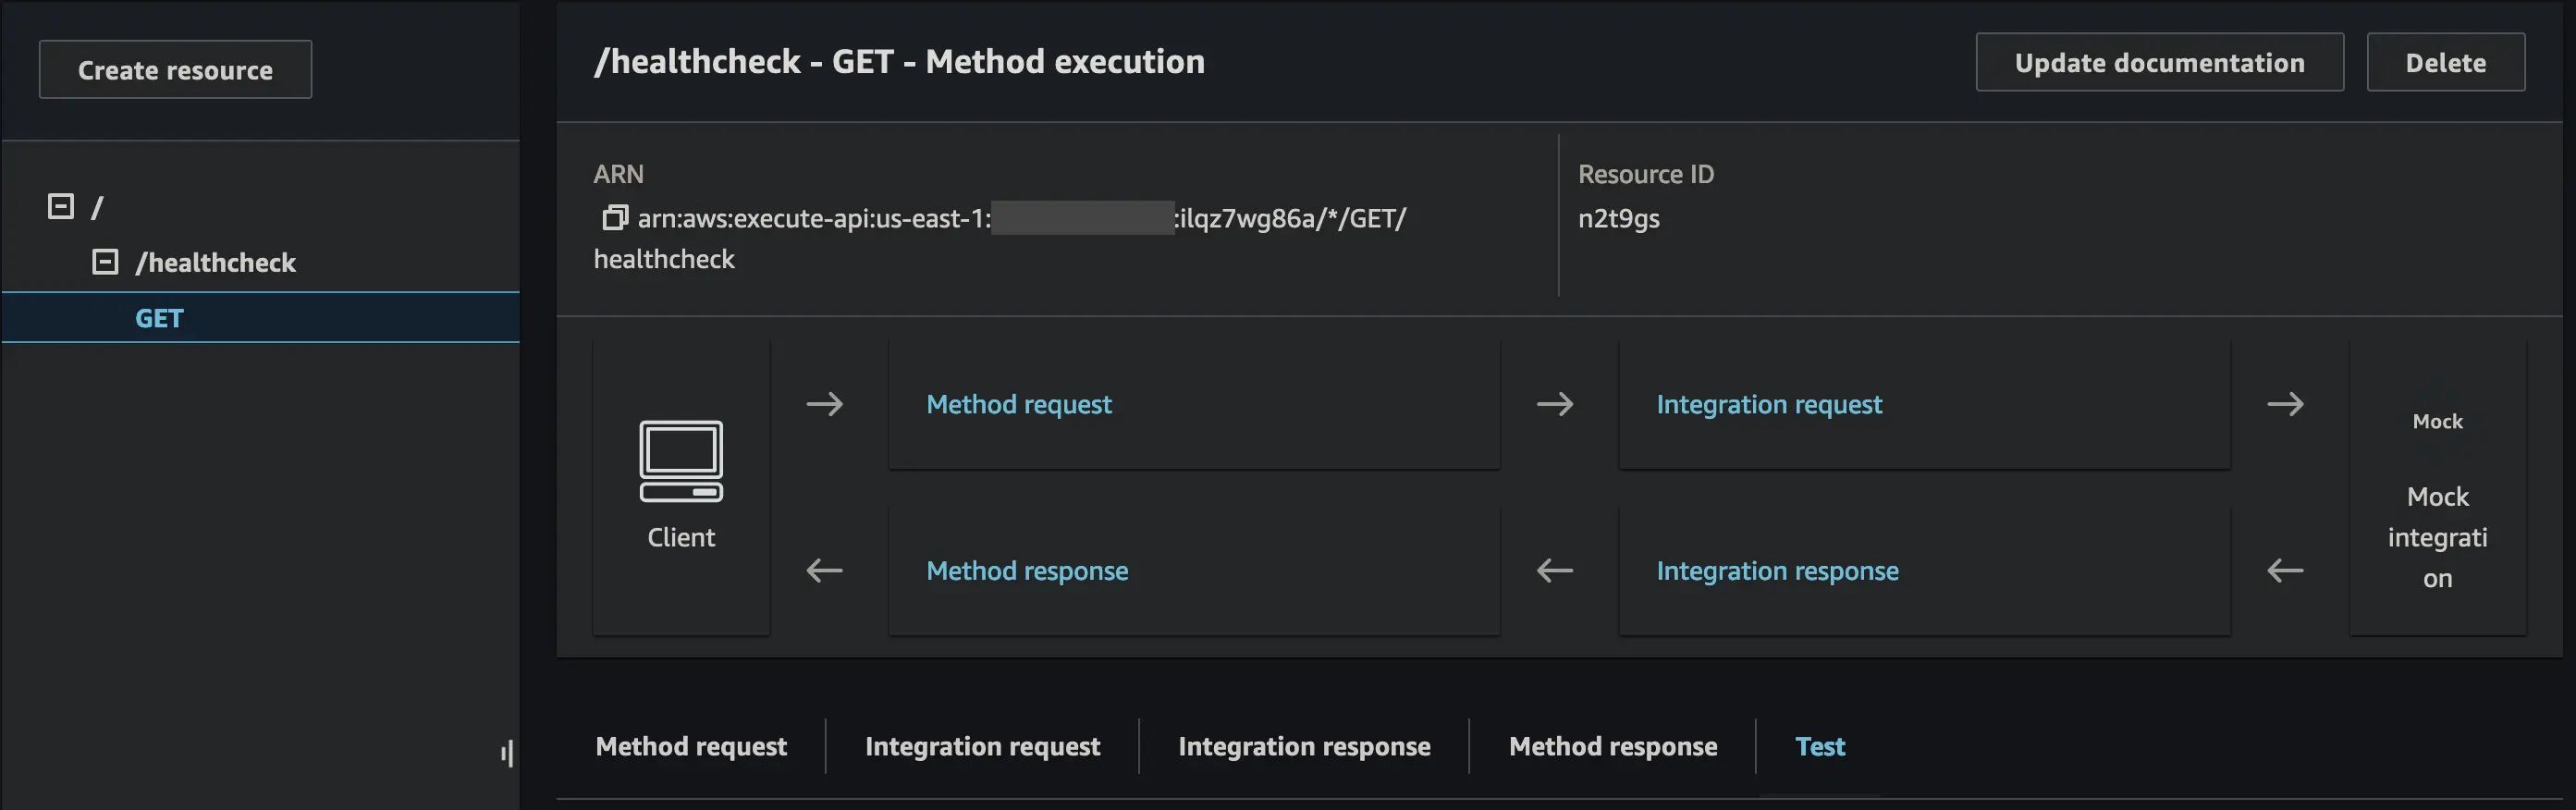
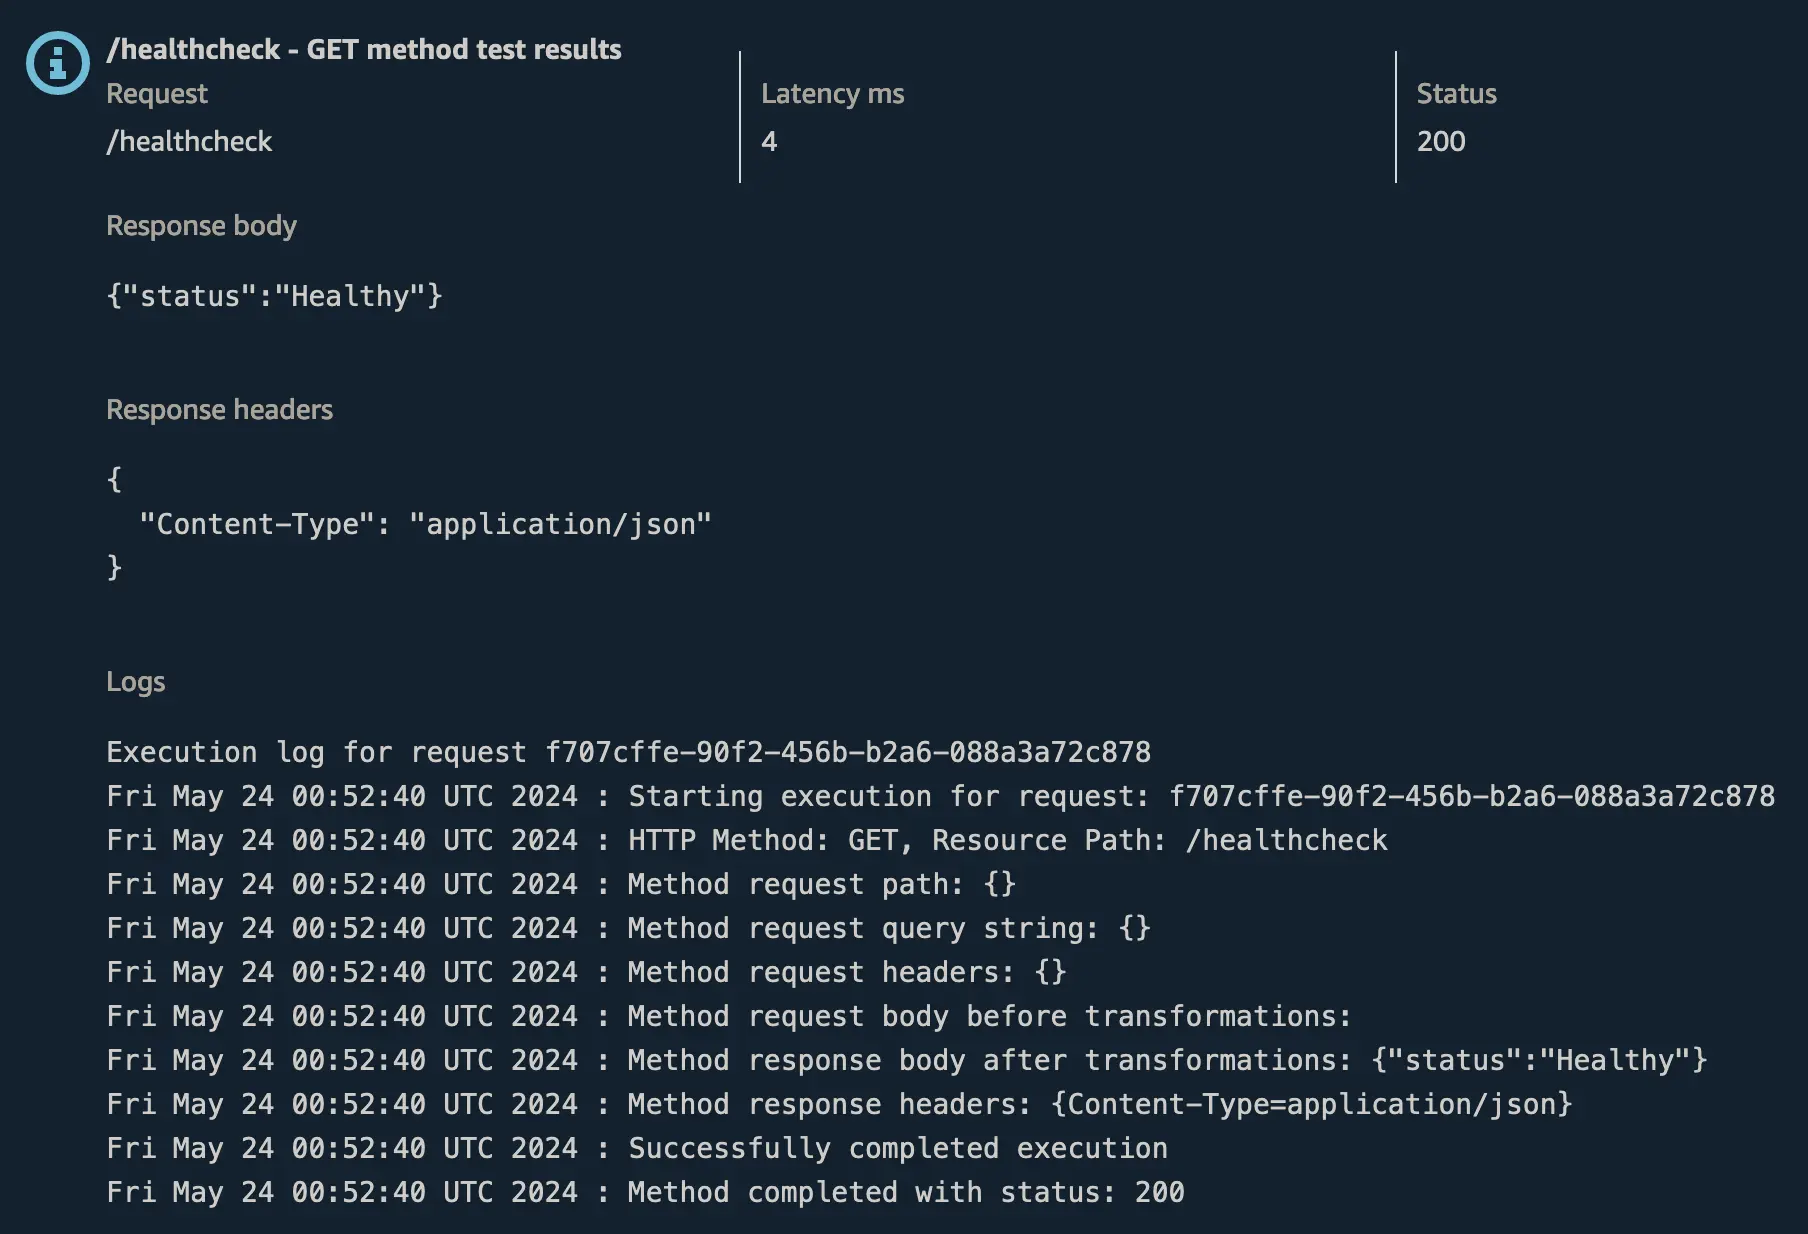
Testing in the Console
At this point we can use the test functionality built-in to the AWS Console to verify our API is responding how we expect it to. This skips the API Gateway authorisation and directly invokes your method.
- In the Console navigate to the
GETmethod for our healthcheck resource
- Click on
TestthenTestagain (we don’t need any additional parameters) - Success (hopefully)

Step 8: Create a Deployment
Now we have verified our API works, let’s actually deploy it!!!
A deployment is a snapshot of everything that makes up your API, its configuration, resources, methods and integrations at a specific point in time.
It allows you to publish changes to your API and make them available in a specific stage.
1
2
3
4
5
6
7
8
9
10
11
12
13
14
15
16
17
18
19
20
21
22
23
24
25
26
27
28
29
30
31
// Create a deployment for the API Gateway REST API, if any of the API resources change, a new deployment will be created
resource "aws_api_gateway_deployment" "default" {
  rest_api_id = aws_api_gateway_rest_api.api.id

  lifecycle {
    create_before_destroy = true
  }

    variables = {
      // For new changes to the API to be correctly deployed, they need to
      // be detected by terraform as a trigger to recreate the aws_api_gateway_deployment.
      // This is because AWS keeps a "working copy" of the API resources which does not
      // go live until a new aws_api_gateway_deployment is created.
      // Here we use a dummy stage variable to force a new aws_api_gateway_deployment.
      // We want it to detect if any of the API-defining resources have changed so we
      // hash all of their configurations.
      // IMPORTANT: This list must include all API resources that define the "content" of
      // the rest API. That means anything except for aws_api_gateway_rest_api,
      // aws_api_gateway_stage, aws_api_gateway_base_path_mapping, that are higher-level
      // resources. Any change to a part of the API not included in this list might not
      // trigger creation of a new aws_api_gateway_deployment and thus not fully deployed.
      trigger_hash = sha256(join(",", [
        jsonencode(aws_api_gateway_resource.healthcheck),
        jsonencode(aws_api_gateway_method.get_healthcheck),
        jsonencode(aws_api_gateway_integration.get_healthcheck),
        jsonencode(aws_api_gateway_method_response.get_healthcheck),
        jsonencode(aws_api_gateway_integration_response.get_healthcheck),
        jsonencode(aws_api_gateway_api_key.this)
      ]))
    }
}
Note: I can’t take any credit for the triggers to recreate the api gateway deployment, I got it from a collegue who may have got it from this Github Issue
Step 9: Create a Stage
A stage is an environment where you deploy and manage a specific version of your API.
Stages let you have separate environments such as prod or uat and each stage has its own unique URL for accessing the API.
Just to be completely different, we will use default as our stage name…
1
2
3
4
5
6
// Create a stage for the API Gateway REST API
resource "aws_api_gateway_stage" "default" {
  deployment_id = aws_api_gateway_deployment.default.id
  rest_api_id   = aws_api_gateway_rest_api.api.id
  stage_name    = var.stage_name // "default"
}
Step 10: Create an API Key and Usage Plan (Optional)
The next couple of resources are optional if you are using another type of authorisation but for those following along at home…
1
2
3
4
5
6
7
8
9
10
11
12
13
14
15
16
17
18
19
20
// Create an API key for the API Gateway REST API
resource "aws_api_gateway_api_key" "this" {
  name = "default"
}

// Create a usage plan for the API Gateway REST API
resource "aws_api_gateway_usage_plan" "this" {
  name = "default"
  api_stages {
    api_id = aws_api_gateway_rest_api.api.id
    stage  = aws_api_gateway_stage.default.stage_name
  }
}

// Associate the API key with the usage plan
resource "aws_api_gateway_usage_plan_key" "this" {
  key_id        = aws_api_gateway_api_key.this.id
  key_type      = "API_KEY"
  usage_plan_id = aws_api_gateway_usage_plan.this.id
}
Outputs
To test out our newly created API, we will need a couple of bits of information. Rather than looking through the AWS console and the AWSCLI documentation everytime, let’s use Terraform outputs.
1
2
3
4
5
6
7
output "api_url" {

  value = aws_api_gateway_stage.default.invoke_url
}
output "get_api_key_string" {
  value = "export API_KEY=$(aws apigateway get-api-key --api-key ${module.api_gateway.api_key_id} --include-value) | jq $_.value"
}
Note: Make sure you have AWSCLI installed: For MACOS brew install awscli
Now, paste the value from the output of get_api_key_string into your bash shell to store the output of the AWSCLI command as an environment variable called API_KEY
1
2
3
4
export API_KEY=$(aws apigateway get-api-key --api-key abcdedfghi --include-value | jq -r '.value')

env | grep API_KEY
API_KEY=VwnotQ8aEgrealIL9pv5Pkey1c37HFWC4f0ACTl4
Putting it all together:
Example: Missing API Key in Header
1
2
3
curl https://2y2732vi3c.execute-api.ap-southeast-2.amazonaws.com/default/healthcheck

{"message":"Forbidden"}
Example: x-api-key in Header:
1
2
3
curl -H "x-api-key: ${API_KEY}" https://2y2732vi3c.execute-api.ap-southeast-2.amazonaws.com/default/healthcheck

{"status":"Healthy"}