Ansible Dynamic Inventory
What is Ansible??
“Ansible is an open source IT automation engine that automates provisioning, configuration management, application deployment, orchestration, and many other IT processes.”
I have heard Ansible being called a “swiss army knife” in the past as it can do a lot of things well. Ansible can be used as a wrapper around a bash command all the way to running custom modules or plugins that you have hand crafted to solve a particular problem or task.
This blog isn’t going to be an Ansible 101, instead I will be focusing on Ansible’s ability to dynamically build an inventory by retrieving it from a remote endpoint.
Why do this?
A prime use case is where your environment changes regularly from say adding/removing hypervisors or EC2 instances that then need to be configured once registered in AWS Session Manager. Rather than updating a host file each time there is a change (and let’s be honest, this will be forgotten about many times), why not use an external inventory management system or IPAM such as Netbox. This external system will have its own workflows, automation and/or Standard Operation Procedure (SOP) to update it.
For the purpose of this blog, I wanted to focus on showing the information getting to Ansible rather than showing how to centrally store the information that feeds the endpoint. To that end, I will be using FastAPI as the endpoint running in a docker container. So let’s build that.
Build Time:
To get started we need some code that will be executed whenever an ansible playbook is run. This code will respond to HTTP GET requests whenever the endpoint /inventory is hit and will return a JSON response with our inventory.
Endpoint Code:
1
2
3
4
5
6
7
8
9
10
11
12
13
14
15
16
17
18
19
20
21
22
23
24
25
26
27
28
29
30
31
32
33
34
35
36
37
38
39
40
41
42
43
44
45
46
47
48
from fastapi import FastAPI

app = FastAPI()

hypervisor_nodes = {
    "host01": {
        "ip": "10.10.1.1",
        "location": "primary",
        "function": "hypervisor"
    },
    "host02": {
        "ip": "10.10.1.2",
        "location": "primary",
        "function": "hypervisor"
    },
    "host03": {
        "ip": "10.10.1.3",
        "location": "secondary",
        "function": "hypervisor"
    }
}

@app.get("/inventory")
def get_inventory():
    inventory = {
        "all": {
            "hosts": [host for host in hypervisor_nodes],
            "vars": {}
        },
        "hypervisors": {
            "hosts" : [host for host, values in hypervisor_nodes.items()],
            "vars": {}
        },
        "_meta": {
            "hostvars": {
                host: {
                    "ansible_host": values['ip'],
                    "location": values['location'],
                    "function": values['function']
                } for host, values in hypervisor_nodes.items()
            }
        }
    }
    return inventory

if __name__ == "__main__":
    import uvicorn
    uvicorn.run(app, host="0.0.0.0", port=8000)
Requirements file:
Next, we need a requirements.txt file to define the python package versions we want to use. It’s best practice to do this to ensure reproducibility and consistently for your code across different environments.
1
2
fastapi==0.112.0
uvicorn==0.30.6
Dockerfile:
We also need the Dockerfile itself. This file defines how the container is built:
python:3.12-slimis used as the base image/appis set as the working directory for the coderequirements.txtis copied into the container andpipis used to install the specified version of the python packages- The application/FastAPI code
main.pyis then copied into the container TCP 8000is exposed from our containerunicornis used as the HTTP server, listening for requests on TCP 8000 for any IP address the container has.
1
2
3
4
5
6
7
8
9
10
11
12
13
FROM python:3.12-slim

WORKDIR /app

COPY requirements.txt .

RUN pip install --no-cache-dir -r requirements.txt

COPY main.py .

EXPOSE 8000

CMD ["uvicorn", "main:app", "--host", "0.0.0.0", "--port", "8000"]
Building the container image:
With all that done, time to build and run the container:
From the directory where the Dockerfile is located, run the following:
1
docker build -t blog/ansibleinventory:latest -t blog/ansibleinventory:0.1 .
This will build an image with the specified name and tag. Using a versioned release of a docker container is another one of those best practices.
1
2
3
4
docker images

REPOSITORY                TAG       IMAGE ID       CREATED          SIZE
blog/ansibleinventory     0.1       4558cbcd740a   3 minutes ago    153MB
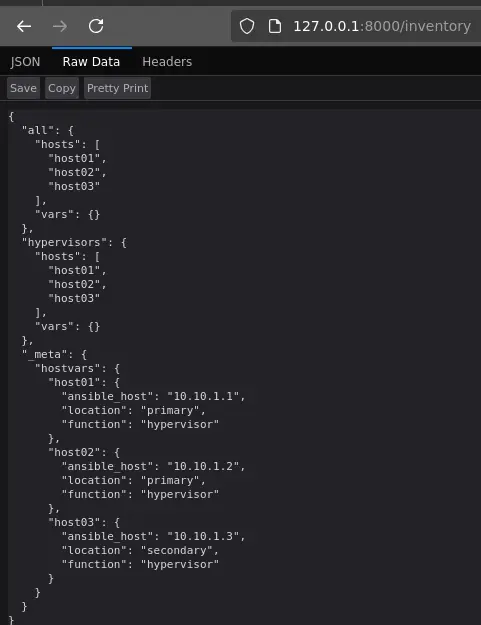
Accessing the data:
Finally, run the container and access it from a web browser.
1
docker run -d --name inventory -p 8000:8000 blog/ansibleinventory:0.1
Back to Ansible:
We now have the endpoint to retrieve and present our inventory but we still need to create the code for the Ansible side. So here it is….
**Note: change the base_url, port and resource variables to suit **
1
2
3
4
5
6
7
8
9
10
11
12
13
14
15
16
17
18
19
20
21
22
23
24
25
26
27
28
29
30
31
#!/usr/bin/env python3

import json
import requests

class DynamicInventory:
    def __init__(self, base_url='http://127.0.0.1', port=8000):
        self.base_url = base_url
        self.port = port

    def get_response(self, resource):
        url = f'{self.base_url}:{self.port}/{resource}'
        try:
            response = requests.get(url)
            response.raise_for_status()  # Raise an HTTPError for bad responses
            return response
        except requests.RequestException as e:
            print(f"Error fetching inventory {resource}: {e}")
            return None

    def get_inventory(self):
        response = self.get_response('inventory')
        if response:
            inventory = response.json()
            return json.dumps(inventory)
        else:
            return json.dumps({})

if __name__ == "__main__":
    inventory = DynamicInventory().get_inventory()
    print(inventory)
Test Playbook:
To test whether we can retrieve our inventory let’s create a simple playbook. This playbook will print the hypervisor ip, location and function for each of the hypervisors.
1
2
3
4
5
6
7
8
9
10
11
- name: Play for testing dynamic inventory
  hosts: hypervisors
  gather_facts: no

  tasks:
    - name: Print all hypervisors
      debug:
        msg:
          - "hypervisor_ip: {{ ansible_host }}"
          - "location: {{ location }}"
          - "function: {{ function }}"
Instead of Ansible using a local inventory file, we need to tell it to use our python script and therefore remote endpoint. This can either be done in ansible.cfg (set and forget) or done manually each time the playbook is run.
Set and forget:
ansible.cfg
1
inventory = ./inventory.py
Manually:
1
ansible-playbook -i inventory.py test_inventory.yaml
Result:
All going well, you should see an output similar to this….
1
2
3
4
5
6
7
8
9
10
11
12
13
14
15
16
17
18
19
20
21
22
23
24
25
26
27
28
29
PLAY [Play for testing dynamic inventory] *******************************************************************************************************************************************************************************************

TASK [Print all hypervisors] ********************************************************************************************************************************************************************************************************
ok: [host01] => {
    "msg": [
        "hypervisor_ip: 10.10.1.1",
        "location: primary",
        "function: hypervisor"
    ]
}
ok: [host02] => {
    "msg": [
        "hypervisor_ip: 10.10.1.2",
        "location: primary",
        "function: hypervisor"
    ]
}
ok: [host03] => {
    "msg": [
        "hypervisor_ip: 10.10.1.3",
        "location: secondary",
        "function: hypervisor"
    ]
}

PLAY RECAP **************************************************************************************************************************************************************************************************************************
host01                     : ok=1    changed=0    unreachable=0    failed=0    skipped=0    rescued=0    ignored=0
host02                     : ok=1    changed=0    unreachable=0    failed=0    skipped=0    rescued=0    ignored=0
host03                     : ok=1    changed=0    unreachable=0    failed=0    skipped=0    rescued=0    ignored=0